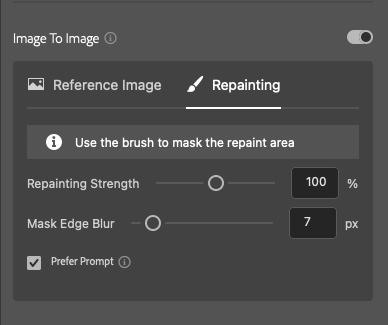
Repaint the Masked Pixels
Select a part of the current image and repaint. The repainting area can either be within the image or along the image's edge (to expand the image).
Repaint Inside the Image
Switch on the img2img tool on the PICPIK plugin panel and select "Repainting". Click the "Create Mask Layer" button, and a new mask layer will appear on the layer panel:

Use the brush tool to draw a masked area to be repainted. You can also utilize the selection tool and fill:

Make a selection, representing the boundary and position of the image you want to regenerate. Generally speaking, the selection should be larger than the repaint mask, which is convenient for PICPIK to obtain more reference information.

Click the generate button. You can also generate multiple images at the same time to select. There may be visible seams at the edge of the picture after completion, which can be handled with the mask tool:

Repaint the Edge of the Image
The operation of repainting the edge is slightly different from the previous one. To ensure the completeness of the generated content, before repainting, the selection required for generation should only contain the repaint mask and the original picture content, avoid blank content or transparent pixels in the selection:

The effect after generation is as follows:

Parameters Description

The repaint tool provides 3 adjustable parameters. "Repainting Strength" is used to set the influence of the original picture. The stronger the strength, the stronger the influence of the original picture.
"Mask Edge Blur" is used to handle the image transition between the repaint part and the original picture. Sometimes the repainted picture may have a color difference from the original one, a larger edge blur can make the image transition more natural.
"Prefer Prompt" is related to the importance of the prompts during the generation. If this option is on, it will consider the role of prompts more during the generation process.